Showing posts with label Home Improvement. Show all posts

Thursday, January 7, 2010

How To Make Flowers Last

1 comments

The tips are:

  • Keep the flowers out of reach for children
  • Cut the stems on an angle to make sure the capillaries are wide open to take up water
  • Remove all leaves below the water line
  • Keep water in the vase
  • If there was no flower food packet included, add a crushed aspirin and some sugar to the water
  • When the flowers begin to fade, re-purpose the rest of the bouquet
The day after Valentine's Day, flower bouquets from sweethearts around the world begin to fade. A rose's vibrant red dulls to dried-out brown, and flowers begin to droop. Some say adding a citrus-flavored soda, such as 7-Up or Sprite, or an alcohol like vodka to the vase of water will lengthen the time these flowers remain beautiful. According to floriculturists, they are right; if the mixture of soda and water is in the correct proportion, a bouquet will remain bright, because the combination provides the flowers with the water and food they need.

Wednesday, December 9, 2009

Painting Ideas for Nursery

0 comments


Many readers have been talking about decorating the nursery or child's room. So here we go.

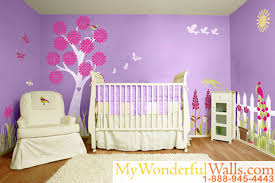
The task of painting a baby’s nursery seems to be no different than that of any other room. However, a bit of extra effort and creativity will go a long way in brining about a huge difference. Instead of doing the job by merely choosing a solid color and slapping it on the walls, try to add some details to it. You may adorn the walls with wallpaper borders or choose different patterns to accentuate them. Such innovative thinking will definitely create an inviting space for your newborn. If you need some help, make use of the information on nursery painting designs and colors, provided in the lines below.
Nursery Paint Ideas
Single Solid Colors
Traditionally, boys' nurseries are painted in blue, whereas the conventional color chosen for girl child’s room is pink. Instead of repeating the same thing, try to do something different. Think about neutral colors for your baby’s nursery. Light shades of yellow and green are good options. These colors will work great for both the genders. Moreover, you may reuse the nursery for the next baby, of either sex, without having to repaint it.
Dual-Toned Interior
A single, solid color is not the only option for painting nurseries. You may also opt for a dual-toned interior. This will make the room look more dressed up, as compared to a single-colored wall. Go ahead and paint the wall in two different colors - one for the top half and the other for the bottom half. The combinations of pink and purple as well as yellow and blue are a hit. You may also choose two different shades of the same color, to paint the walls.
Patterns
There are literally thousands of patterns to choose from, for your baby’s nursery. Vertical stripes, big squares and circles are some of the most preferred patterns. Multi-colors can be used to paint squares and circles on the walls. This will bring life to the walls and make them look very pretty as well. Another bright option is to paint small sized checks on smaller areas of the wall and use a solid coordinating color in the rest of the room.
Wall Murals
Painting wall murals is a bright idea as far as personalizing your baby’s nursery is concerned. You can either paint a mural yourself or hire a muralist to serve the purpose. Baby room murals usually come in the form of wallpaper sheets, which can be easily pasted on the wall. This will give a substance to the walls. You can even figure out a story out of the murals! Beautify your baby’s nursery by applying the mural on one of the walls.
Themed Painting
You may also choose a theme to paint the nursery. Some of the most popular themes include angles, airplane, jungle, ocean and castle. You may also opt for simpler themes, such as clouds, or paint the walls to resemble the ocean. Special technique can be applied to give a three-dimensional effect to such walls. You may either choose do it yourself or hire a professional to accomplish the task. The result will definitely be worthwhile!

Friday, July 10, 2009

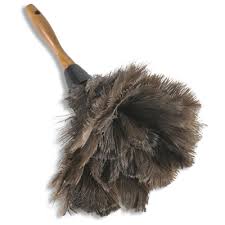
How to wash a feather duster

0 comments
Many of us are using feather duster to clean everyday dust. They become so messy after sometime we have to throw them away. But regularly washing of the dirt from them helps them stay great longer.
  • Fill a bucket or sink with lukewarm water and a little bit of gentle liquid dish detergent or baby shampoo. You want the water level to be deep enough to cover the feathers easily.
  • Lay the feather duster in the water, completely immersing it. Pick it up by the handle (keep the feathers in the water) then twist the duster fairly quickly left to right so that the moving water will swish through the feathers and push out dust, dirt and any grime buildup. Do this for a minute or two being careful not to break the feathers.
  • If you have a double sink, fill the other sink with clear lukewarm water, or empty the sink/bucket and fill with clear water. Submerge the soapy feathers into the water and dunk it up and down a few times, trying to remove as much soap as possible. Do a final rinse under running water until the water runs clear and there is no more soap.
  • Gently tap out the duster so excess water sprays into the sink. Then take the duster outside and forcefully shake the duster into the air several times to remove as much water as possible.
  • Next, set the duster into a clean pop bottle (large), handle down so that the feathers stick out above the bottle. The pop bottle will hold the duster and allow the feathers to air dry. When the feathers are still damp (several hours later or overnight), take a hair dryer and blow them completely dry. The hair dryer will soften the feathers.

Saturday, July 4, 2009

Picks and Tricks

1 comments
Have you got lots of used dryer sheets when you throw out the trash? Used dryer sheets are great dirt picker uppers due to their texture. They are great with window sills, ceiling fans, book shelves etc. It is a greener way to save cash and also you can save on paper towels.

Those who might feel your hands are becoming rough because of washing dishes everyday can try this. Before putting on the rubber gloves slather on your moisturizer. The heat from the water helps the cream penetrate into the skin. When the gloves come off the hands will feel supersoft and smooth. Come on ladies, you deserve a little pampering.
Blog Widget by LinkWithin
Parenting

Followers

Tweet Tweet

Brag Badges


Woman Talk Copyright 2008 Fashionholic Designed by Ipiet Templates Supported by Tadpole's Notez